Why Curing Matters More Than “Letting It Dry”
Concrete doesn’t “dry”—it hardens through hydration, a chemical reaction between cement and water. Curing is everything you do to manage moisture, temperature, and time so hydration can proceed properly.
Good curing:
- Maximizes final strength and durability
- Reduces cracking and surface dusting
- Improves abrasion and freeze–thaw resistance
- Helps finishes (coatings, sealers, adhesives) last longer
Poor or rushed curing can reduce compressive strength by 30% or more, even if the mix was designed correctly. That means the smartest way to get stronger, longer‑lasting concrete isn’t always to upgrade the mix—it’s to manage the first 7–14 days with discipline.
1. Plan Curing Before You Schedule the Pour
Effective curing starts during planning, not after the last trowel pass. Treat it as part of the scope, not an add‑on.
Consider these factors up front:
- Exposure conditions: Is the slab indoors, outdoors, in direct sun, or exposed to wind? Exterior slabs and thin sections are at higher risk of rapid moisture loss.
- Season and climate: Hot, dry, or windy weather dramatically increases evaporation; cold weather slows hydration and can halt it if the concrete freezes.
- Element type: Flatwork, footings, walls, and precast elements all require different curing methods and access.
- Access and safety: Will you be able to safely apply water curing or cover the slab quickly after finishing? Are there vehicle routes or foot traffic to manage?
- Follow‑on trades and schedule: When will saw‑cutting, framing, or machinery loading occur? Work backward to define minimum curing time.
Implementation steps:
- Specify the method in your plan or notes (water curing, wet coverings, curing compound, or a combination).
- Estimate materials: polythene sheeting, wet burlap, curing compound, sprayers, water supply, weights or tapes to secure covers.
- Assign responsibility: Clearly define who is responsible for applying and maintaining curing measures on day 1, day 2, and beyond.
- Document targets: Minimum curing duration (days), temperature range, and surface condition required before loading or coating.
When curing is planned as a line item, it’s much easier to execute consistently, especially on busy or multi‑trade sites.
2. Control Evaporation: Protect the Surface From Day One
The most common curing failure is allowing the surface to lose moisture too quickly, particularly in the first 24–48 hours. Even if the slab looks fine at first, internal shrinkage and micro‑cracking can severely reduce strength and durability.
Key practical tactics:
- Watch the weather, not just the thermometer:
- High temperature + low humidity + wind = aggressive moisture loss.
- Overcast, cool, and humid = more forgiving.
- Use an evaporation rate chart or calculator: Industry charts (ACl‑based) estimate evaporation from air temp, concrete temp, wind speed, and relative humidity. If you’re anywhere near 0.2 kg/m²/hr (about 0.04 lb/ft²/hr), extra protection is essential.
- Apply an evaporation reducer during finishing:
- These are not curing compounds; they are temporary films that slow surface moisture loss between finishing passes.
- Spray lightly according to manufacturer instructions—too much can interfere with finishing.
- Minimize wind and direct sun where feasible:
- Erect temporary windbreaks or shade on exposed sites when practical.
- Avoid pouring in the hottest part of the day when possible.
- Reduce unnecessary delays during placement:
- Keep delivery and placing coordinated so one area doesn’t sit unprotected while other sections are placed or finished.
By managing evaporation from the start, you reduce the risk of plastic shrinkage cracking and give your later curing methods a better chance of success.
3. Choose the Right Curing Method for the Job
No single curing method fits every situation. Use the approach that best matches your project, climate, and access constraints—sometimes a hybrid is ideal.
Water Curing (Ponding or Continuous Wetting)
- Best for: Slabs where you can retain water, test panels, and high‑performance or critical structural elements.
- Pros: Excellent moisture control and temperature moderation; often produces the highest strengths.
- Cons: Water supply needed, risk of erosion if improperly applied, more labor‑intensive.
How to execute:
- Create temporary dams with sand or wood to form shallow ponds on flatwork.
- Maintain a constant water layer (usually 1–2 cm / ½ in) for at least 7 days for typical mixes.
- For vertical work, use continuous misting or soaker hoses and ensure constant wetness without washing out the surface.
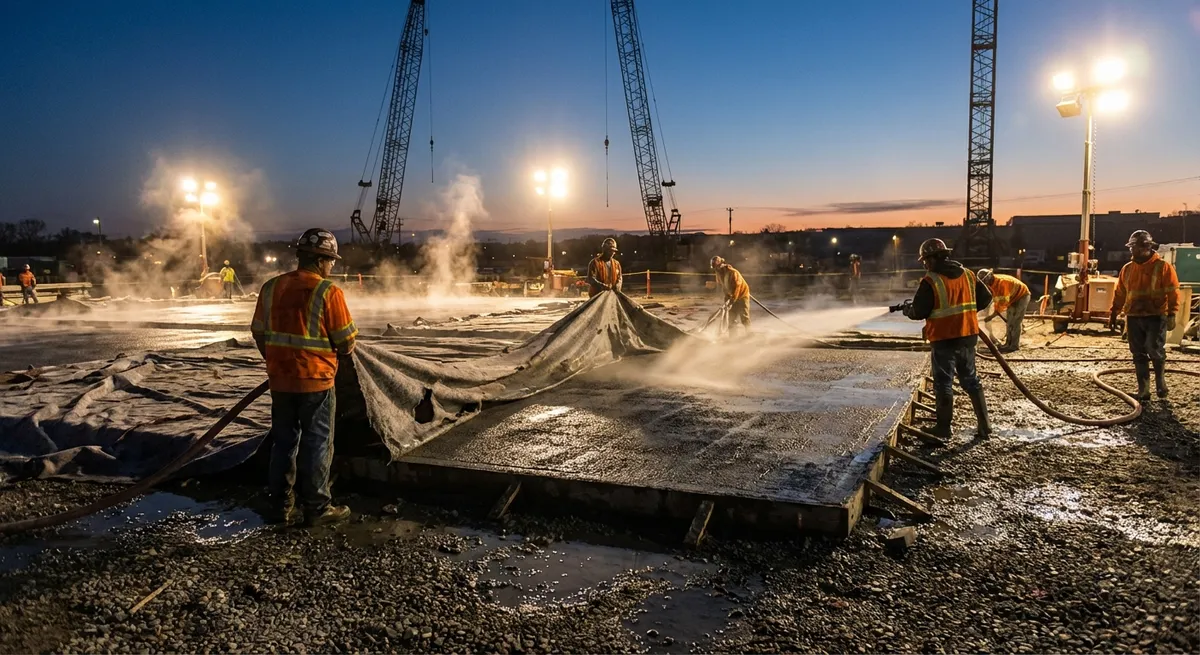
Wet Coverings (Burlap, Mats, or Geotextiles)
- Best for: Slabs and flatwork exposed to sun/wind where ponding isn’t practical.
- Pros: Maintains moisture directly at the surface; more efficient water use than open ponding.
- Cons: Covers can dry out or blow away; requires monitoring.
How to execute:
- Pre‑soak burlap or curing blankets thoroughly before placing.
- Lay them flat with full contact—no air gaps or wrinkles that can cause uneven curing.
- Keep them continuously wet; re‑water as needed without creating runoff that washes fines off the surface.
Plastic Sheeting (Polyethylene)
- Best for: Slabs where water availability is limited, or where curing compound is not preferred before coatings.
- Pros: Excellent moisture retention; relatively low cost.
- Cons: Can cause mottling or discoloration; must be secured well to prevent wind damage.
How to execute:
- Use light‑colored or white film in hot weather to reduce heat buildup.
- Place sheeting as soon as the surface can bear it without marring.
- Overlap joints generously (150–300 mm / 6–12 in) and seal with tape or weights.
Curing Compounds (Chemical Membranes)
- Best for: Large exterior flatwork, industrial slabs, roadways, and when continuous water curing isn’t feasible.
- Pros: Quick to apply, good moisture retention when applied correctly, ideal for high‑productivity sites.
- Cons: Some are incompatible with future coatings or adhesives; coverage must be uniform.
How to execute:
- Select curing compounds compliant with project requirements (e.g., ACI, ASTM C309).
- Use low‑pressure sprayers with even, overlapping passes.
- Follow manufacturer’s coverage rates closely; too thin = poor curing, too thick = potential peeling or residue.
- If coatings or overlays are planned, confirm compatibility or schedule mechanical removal later (shot‑blasting, grinding).
For many projects, a hybrid approach works well—e.g., evaporation reducer during finishing, followed by curing compound, then plastic sheeting for the first few critical days.
4. Manage Temperature to Protect Strength and Durability
Temperature directly affects both the speed and quality of hydration. Ignoring it can lead to weak surfaces, thermal cracking, or even frozen concrete.
Hot Weather Considerations
- Hydration speeds up and water evaporates faster, increasing shrinkage and early micro‑cracking risk.
- Concrete can reach high internal temperatures, which can reduce ultimate strength in thick sections.
Practical controls:
- Use cool mixing water or shade aggregate if allowed by your supplier and spec.
- Schedule pours for early morning or late afternoon.
- Use white curing covers or reflective blankets to reduce heat gain.
- Start curing as early as finishing allows—don’t leave hot surfaces exposed.
Cold Weather Considerations
- If concrete freezes before gaining sufficient strength, the hydration process is disrupted and strength can be permanently compromised.
- Hydration slows dramatically at low temperatures, extending the time needed before form removal or loading.
Practical controls:
- Use cold‑weather admixtures or accelerated mixes as designed by your ready‑mix supplier or engineer.
- Keep forms and subgrade free of ice and standing water before placement.
- Use insulating blankets over slabs; for heavily reinforced or structural elements, consider heated enclosures if specified.
- Maintain concrete above the minimum recommended temperature (often around 10°C / 50°F for standard mixes, but follow your engineer’s or ACI‑based guidance).
Monitoring helps:
- Use simple surface temperature thermometers or embedded sensors for critical work.
- Keep a log of ambient conditions and curing measures—especially useful for commercial or inspected projects.
5. Respect the Clock: Curing Duration and Early Loading
Curing is time‑dependent. Even with optimal moisture and temperature control, concrete needs days—not hours—to develop meaningful strength.
Key guidelines:
- First 24 hours: Most critical for preventing plastic shrinkage and early surface damage. Keep the surface protected and moist.
- First 7 days: Standard minimum wet‑curing period for many mixes if conditions are favorable; often longer for exposed, structural, or high‑performance elements.
- 7–28 days: Strength continues to develop; heavy loads, anchors, or finishes should follow engineering requirements or manufacturer specs, not just the calendar.
Practical scheduling tips:
- Don’t use “walkable” as your only metric; the fact that you can walk on a slab within 24–48 hours does not mean it’s ready for equipment, racking, or vehicle traffic.
- Coordinate with trades:
- Saw‑cutting joints: Typically performed within hours after finishing, but before uncontrolled cracking begins. This is separate from curing and must be planned to avoid both raveling and delayed cuts.
- Framing and light work: Often acceptable after a few days on residential slabs, but verify with local code guidance and your engineer where applicable.
- Heavy machinery or storage: Frequently deferred until 7–28 days depending on design loads.
For DIYers:
- Read product tags for bagged mixes; many state minimum cure times before setting posts, attaching anchors, or applying load.
- If in doubt, err on the side of longer curing—especially for structural or exterior work exposed to weather.
For professionals:
- Use cylinder or field‑cure tests as required by specification to verify actual strength development for time‑critical activities like form removal, tendon stressing, or heavy loading.
Conclusion
Strong concrete isn’t just about mix design and placement technique—the curing phase is where potential becomes performance. By planning curing before you pour, controlling evaporation, selecting the right curing method, managing temperature, and respecting realistic timeframes, you dramatically reduce the risk of cracking, weak surfaces, and premature failures.
For both contractors and committed DIY builders, treating curing as a core skill—on par with finishing or forming—pays off in fewer callbacks, longer‑lasting flatwork, and structures that actually meet the expectations you designed for. The work you do in the first week silently determines how your concrete behaves for years.
Sources
- [American Concrete Institute – Guide to Curing Concrete (ACI 308R)](https://www.concrete.org/store/productdetail.aspx?ItemID=30816) - Industry reference outlining curing principles, methods, and recommended practices.
- [Portland Cement Association – Design & Control of Concrete Mixtures](https://www.cement.org/learn/materials-applications/concrete-materials/design-control-of-concrete-mixtures) - Comprehensive technical guidance on concrete behavior, including curing and strength development.
- [U.S. Federal Highway Administration – Concrete Pavement Field Reference](https://www.fhwa.dot.gov/pavement/concrete/pubs/07027/) - Practical field information on concrete placement and curing for transportation infrastructure.
- [The Constructor – Curing of Concrete: Its Methods, Time, & Requirements](https://theconstructor.org/concrete/curing-of-concrete/6076/) - Overview of curing methods, duration considerations, and field recommendations.
- [Cement.org – Concrete in Practice: CIP 11 – Curing In-Place Concrete](https://www.cement.org/learn/concrete-technology/concrete-in-practice-series/cip-11-curing-in-place-concrete) - Concise, practitioner‑focused explanation of why and how to cure concrete on site.