This guide focuses on practical, repeatable techniques for visible concrete work: walkways, patios, steps, small pads, and details that shape the first impression of a property. The goal is simple—clean lines, consistent texture, and fewer callbacks or do-overs.
Planning the Work: Layout, Access, and Timing
Concrete work often fails in the planning phase, not at the mixer or trowel. Before you ever place a form board, define exactly what you’re building and how you’ll move materials.
Start with a scaled sketch that includes dimensions, slopes, and transitions to existing surfaces (doors, steps, driveways, landscaping). Identify the “critical edges” that must look perfect—at the front entry, driveway apron, stair nosings, or visible corners—and plan the work so those areas get the most attention when the concrete is at ideal finishing condition.
Walk the material path from truck or mixer to the pour area. Eliminate tight turns, trip hazards, and soft spots where wheelbarrows might sink. Lay down plywood sheets or compact a temporary path for longer carries. If pump access is available, confirm hose routing and washout locations ahead of time.
Timing matters as much as layout. Consider weather, especially temperature, wind, and direct sun. Hot, dry, or windy days will accelerate set times and surface drying, so schedule pours as early in the morning as possible. Have tools staged and ready—forms complete, rebar or mesh tied, expansion material in place, and water source available—before the truck arrives or you start mixing. Good concrete work rarely allows room for improvisation once the material is moving.
Tip 1: Build Strong, Straight Forms That Shape the Finished Look
Forms do more than hold wet concrete—they define your edges, control your slopes, and telegraph whether the work was professional. Poorly set forms guarantee wavy lines and ponding, no matter how good the mix is.
Use straight, sound lumber or commercial form boards. For walks and slabs, 2x4 or 2x6 lumber is common; ensure boards are dry and not twisted or bowed. Set stakes on the outside of the forms and space them closely enough (typically 2–3 feet apart, tighter on curves) to resist bulging under load. Use screws rather than nails for easier adjustment and tighter joints.
Establish slope deliberately—usually about 1/8" to 1/4" per foot away from structures for exterior work. Set string lines at finished height and use a line level, laser, or builder’s level to transfer elevations to the forms. Check from multiple angles; a slope that looks correct from one direction may show a visible sag from another.
Seal joints between form boards where appearance matters. On highly visible edges, some pros run a bead of caulk or packing material on the outside of the form to limit paste leakage, which can cause honeycombing or weak edges. For curves, use flexible form materials or kerf-cut lumber, but maintain smooth transitions without kinks.
Before concrete placement, double-check every form: top height, straightness, inside corner squareness, stake tightness, and that there are no loose boards. A 10-minute inspection often prevents permanent defects that no amount of trowel work can fix.
Tip 2: Reinforcement and Base Preparation That Prevents Future Problems
The surface you see depends heavily on the base and reinforcement you don’t. Proper support and reinforcement reduce cracking, settlement, and edges that chip or break under load.
Prepare a compacted base using gravel or crushed stone where appropriate, especially in climates with freeze-thaw cycles or poor native soils. Aim for a uniform base thickness and compact in layers if deeper than a few inches. A hand tamper works for small pads; a plate compactor is better for larger areas. Avoid placing concrete directly over soft, organic, or poorly compacted soil.
For reinforcement, choose a system that fits the job: welded wire mesh, rebar grids, or fiber-reinforced concrete mixes. If you use mesh or rebar, it needs to be positioned correctly in the slab—not lying on the ground. Use chairs, dobies, or small supports to keep reinforcement in the middle third of the slab thickness. For foot traffic slabs, #3 or #4 bars at reasonable spacing are usually sufficient; vehicle loads require more deliberate design.
Add control joints and isolation joints to manage cracks and movement. Isolation joints (often with premolded fiberboard or foam) separate slabs from foundations, steps, or other fixed structures. Plan control joint locations before pouring so they align with changes in geometry, re-entrant corners, or transitions to other surfaces. These layouts influence how the slab will crack and what the final appearance will be.
A critical detail many people skip: compact firmly along form edges. Poor edge support leads to curling and chipping where people step on the border of a walk or pad. A well-compacted edge and proper reinforcement often mean the difference between a crisp edge years later and one that crumbles under normal traffic.
Tip 3: Mix Control and Placement Practices for Consistent Results
The best finishing skills cannot fix an inconsistent or overly wet mix. Whether you’re batching with bags or ordering ready-mix, controlling water content and handling placement systematically are key.
If you’re using ready-mix, communicate clearly with the supplier about intended use (patio, driveway, steps) and expected conditions (temperature, anticipated loads). Resist the temptation to add water at the site beyond what’s necessary to achieve a workable slump. Extra water dilutes cement paste, reduces strength, and increases surface dusting and cracking. If more workability is truly needed, discuss admixtures with your supplier rather than guessing with a hose.
For bagged concrete, measure water carefully per manufacturer recommendations and mix consistently across batches. Use mechanical mixing where possible for uniformity. For larger DIY jobs, having at least two people—one dedicated to mixing and one to placing and screeding—helps maintain pace and consistency.
When placing concrete, deposit it as close to its final position as possible instead of shoveling it long distances in the forms. Overworking fresh concrete can cause segregation, where aggregate separates from paste. Place in lifts for deeper sections and work the material into corners and around reinforcement without excessive pounding or rehandling.
Use a vibrator or tamping tool judiciously. Light consolidation helps remove air pockets, particularly around rebar and forms, but excessive vibration can bring too much paste to the surface or cause segregation. Watch for uniform consistency and minimal trapped air, especially along forms where voids will be most visible.
Plan your pour so that you move methodically from one end to the other, maintaining a “wet edge” and avoiding cold joints. On small projects, continuous placement is usually achievable; on larger ones, coordinate truck arrivals or mixing cycles to keep the surface active and workable.
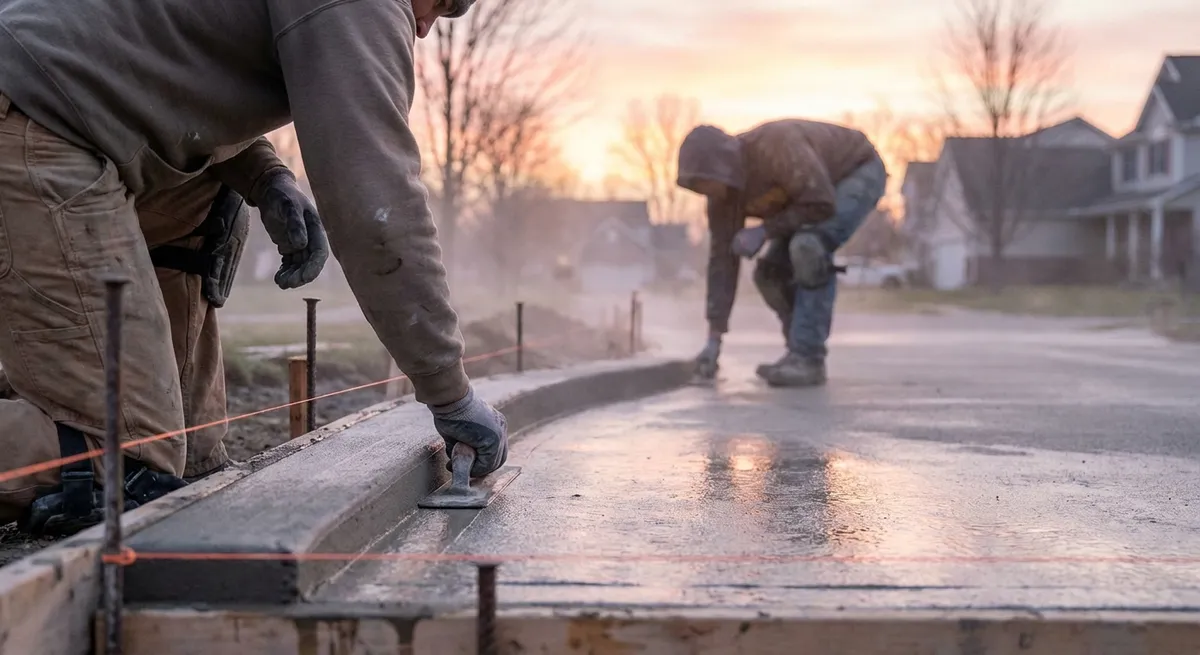
Tip 4: Mastering Screeding, Floating, and Edge Work for a Uniform Finish
The sequence and timing of finishing steps define how flat, durable, and attractive your concrete will be. Cutting corners, especially early in the process, leads to bumps, dips, and weak surfaces.
Begin with screeding as soon as you have enough concrete in the forms to slightly overfill them. Use a straight, rigid screed board or aluminum straightedge longer than the slab width. Saw the screed back and forth while pulling it along the forms, letting excess material ride ahead. Fill low spots as you go rather than trying to fix them later with trowels.
After screeding, immediately bull-float or darby the surface to embed coarse aggregate and bring a small amount of paste to the top. Keep the bull float passes minimal and avoid overworking, which can cause laitance and weaken the surface. Maintain a shallow angle so you’re smoothing, not dragging grooves.
Allow bleed water to rise and evaporate before performing additional finishing. Do not trowel or power trowel while bleed water is present; working this water back into the surface creates weak, dusty, or flaky top layers. This waiting period changes with temperature and humidity—on hot, dry days it can be short, and on cool, damp days it can be noticeably longer.
While the concrete is still plastic but firm enough to support more defined edges, run an edging tool along all exposed sides. This compacts the concrete at the edge, reduces chipping, and creates a clean, intentional profile. Keep the tool moving in smooth, overlapping passes and wipe the edge of the tool clean periodically to avoid leaving drag marks.
For visible slabs like patios and walks, consider a light broom finish for slip resistance and a professional look. Apply the broom when the surface has firmed up but is still workable—too early and you get rough ridges and aggregate pullout; too late and the broom won’t cut. Pull the broom in one consistent direction for a unified appearance, typically perpendicular to the primary walking direction for better traction.
Tip 5: Jointing, Curing, and Protection That Preserve Your Work
What you do after finishing is as important as the pour itself. Proper joints, curing, and early protection extend the life and appearance of your concrete and reduce callbacks.
Cut control joints at the right time and to the right depth. For most slabs, joints should be at least one-quarter of the slab thickness deep (e.g., 1" deep for a 4" slab). If you’re tooling joints while the concrete is plastic, make sure the tool reaches proper depth. If you’re saw-cutting, start as soon as the concrete is firm enough to prevent raveling but before random cracking begins—this window is often within 6–18 hours of placement, depending on conditions and mix design.
Lay out joint spacing to form reasonably square panels and avoid long, narrow strips that are prone to cracking. As a rule of thumb, the joint spacing in feet should not exceed 2–3 times the slab thickness in inches (e.g., about 8–12 feet apart for a 4" slab), but local codes, use, and climate may dictate more conservative spacing.
Implement a curing plan immediately after finishing. Proper curing maintains moisture and temperature in the slab, improving strength gain, reducing shrinkage cracking, and enhancing long-term durability. Methods include curing compounds (sprayed immediately after final finishing and bleed water evaporation), wet burlap or fabric, plastic sheeting, or continuous light misting. For most exterior slabs, maintaining curing for at least 7 days is recommended; longer is beneficial, especially in harsh climates.
Protect fresh concrete from early traffic, heavy loads, and surface damage. Use barriers, caution tape, or temporary fencing to keep people and pets off until the concrete has achieved adequate strength—often a minimum of 24–48 hours for foot traffic and several days to a week for vehicle loads, depending on the mix and conditions. Avoid placing heavy equipment, pallets, or vehicles near slab edges during early curing, as this can cause cracking or edge damage.
In freeze-prone regions, do not apply de-icing salts during the first winter on new concrete, especially those containing ammonium or magnesium compounds. Use sand for traction instead. De-icers can exacerbate freeze-thaw damage on young concrete that hasn’t fully matured.
Finish by documenting what was done: mix specifications, placement date, curing method, and any sealed or treated surfaces. For professionals, this record helps communicate with clients and supports warranty decisions; for DIYers, it provides a reference for future repairs or additions.
Conclusion
Concrete rewards methodical work. Straight, well-set forms, consistent mix control, disciplined finishing, and proper curing all show up in the final look and long-term performance. These practices don’t require exotic tools or advanced training—only planning, attention to timing, and a willingness to let the process, not improvisation, guide the job.
Whether you’re a contractor sharpening your crew’s on-site habits or a serious DIYer tackling walkways and patios, treating each pour as a visible advertisement of your standards pays off. Clean edges, flat surfaces, and durable joints are what people remember, and they’re all built from the same fundamentals applied consistently.
Sources
- [Portland Cement Association – Concrete Slab Finishing Tips](https://www.cement.org/learn/concrete-technology/concrete-construction/placing-and-finishing) – Covers best practices for placing, screeding, floating, and finishing slabs.
- [American Concrete Institute (ACI) – Concrete Fundamentals](https://www.concrete.org/tools/freetopics.aspx) – Provides technical background on mixing, reinforcement, curing, and jointing from an industry standards perspective.
- [U.S. Department of Transportation – Guide for Concrete Pavement Jointing](https://www.fhwa.dot.gov/pavement/concrete/pubs/0702/) – Explains joint design, spacing, and placement strategies to control cracking.
- [National Ready Mixed Concrete Association – Curing Concrete](https://www.nrmca.org/application-guide-for-curing-concrete/) – Details curing methods, timing, and how curing affects strength and durability.
- [University of Nebraska–Lincoln Extension – Residential Concrete Walkways and Patios](https://extensionpublications.unl.edu/assets/pdf/g1530.pdf) – Practical guidance on base prep, reinforcement, finishing, and protection for small residential projects.